8.7 Upgrading the EPROM
The software for the Gemini system is programmed into an EPROM that resides in the
electronics box. You can obtain upgrades for this software in two different forms:
A new EPROM containing the new software
A .hex file that must be programmed into a blank EPROM
If you get the upgrade in the form of a .hex file, you will need a blank EPROM and a
burner capable of programming it. Gemini uses a 512Kx8 EPROM such as a 27C4001 or
27C040.
Once you have obtained a programmed EPROM (either
by buying one or programming your own using the .hex
file) you must install it in the Gemini system. This can
be accomplished as follows:
1. Unplug all cables from the Gemini electronics
box
2. Remove the 6 screws that hold the faceplate onto
the box
3. Remove the faceplate from the box
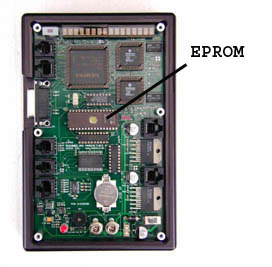
4. Identify the old EPROM on the board using the
diagram to the right
5. Use a small flat blade screwdriver to gently pry
the old EPROM out of the socket. Be sure to
loosen alternately from each end and avoid
bending the pins.
6. Install the new EPROM into the socket. Be sure that the notched end of the
EPROM matches the notched end of the socket. Ensure that all pins actually go
into the socket and are not bent underneath.
7. Replace the faceplate and all 6 screws
8. Replace all cables
Depending on the contents of the upgrade, you may see the message CMOS Reset
when you power up the Gemini. This indicates that all parameters have been returned to
factory defaults. You will need to follow the procedures outlined in chapter 2 to re enter
all of the setup parameters.
Gemini Users Manual
9
4
footer
Our partners:
PHP: Hypertext Preprocessor Cheap Web Hosting
JSP Web Hosting
Ontario Web Hosting
Jsp Web Hosting
Cheapest Web Hosting
Java Hosting
Cheapest Hosting
Visionwebhosting.net Business web hosting division of Vision Web Hosting Inc.. All rights reserved

